31 August 2013

Pineapple Tomato Rasam

pineapple_tomato_rasam_recipe


Rasam is a tangy soup that can make any Indian especially Southies palate go tangy to tango ! Well, it is a sweet , spicy , tangy , soupy and healthy in short .It’s an indispensable part of every South Indian meal especially lunch and dinner. That’s the “must have soup” for South Indians especially with rice.

Honey P (My hubby) is a biiiiiiig fan of Rasam. Being a Hyderabadi cum Keralite I am not at all surprised :).I love watching him gulping and relishing the Rasam  and I would say to myself ,look that’s how one should enjoy the food .It’s like indirectly saying I am grateful to have food on my table. Thank God and Thanks to my beautiful wife ;) Ahem ahem !! :P.

Myself , I love them especially when it is like the Anu Malik’s Song ,”Dekho baarish ho Rahi hai, it’s raining, it’s raining it’s raaaaaaining” . Yeah I enjoy them when it is raining cats & dogs and this spicy tangy soup just makes it more enticing. And also when I am down with cold, cough, fever, aaaaaachoooooo aaaachiiii then because the pepper, turmeric, ginger, garlics in Rasam has got the medicinal properties to soothe and heal . Otherwise I love having more like a soup than with rice. Reminds me how aromatic our house used to be back at home when amma used to make Rasam.hmmmm

Do you know Wikipedia says that one of our hero of the nation, the great freedom fighter,Netaji Subhash Chandra Bose once said that if he had command over India he would have declared Rasam as the National drink :). Interesting right !!:)

Anyways, there are in fact varieties of Rasam. I am gonna make Pineapple Tomato Rasam.


Here is how I make Pineapple Tomato Rasam :


Ingredients 

Pineapple shredded – ½ cup
Tomato chopped - ¼ cup
Tamarind -1 tablespoon
Cilantro leaves chopped – 2 teaspoon
Green Chili – 4 no.
Mustard seeds- ¼ teaspoon
Cumin – ¼ teaspoon
Asafoetida – a pinch
Pepper- ¼ teaspoon
Ginger-garlic- 1 teaspoon
Home made/Readymade Rasam powder – 1 -2 tablespoon
Oil – 1-2 tablespoon
Lemon juice – 1 teaspoon
Coconut shredded – ¼ teaspoon


Preparation


  1. Boil chopped tomato, shredded pineapple (or pureed / chopped into small cubes and should be fresh not canned), tamarind, cilantro leaves, green chili in a pan and later allow them to simmer for a while in low flame.
  2. In another pan, splutter some mustard seeds , cumin seeds, asafoetida, pepper and add ginger garlic to them.
  3. Once the raw smell of ginger garlic disappears, add the Rasam powder and sauté for a minute or two.
  4. Now strain the boiled tomato,pineapple,tamarind,cilantro,green chili as in step 1 (if you want a clear Rasam ) or use as it is and put it into the tempering pan above (Step 2-3)
  5. Allow them to boil together and simmer for a while so that every flavor blends in like 2 minutes.
  6. Now remove Pineapple tomato Rasam from the stove , add Lime juice and stir well.
  7. Garnish the Rasam with cilantro leaves and shredded coconut.
  8. Pineapple Tomato Rasam is ready . Serve it with rice or have it as a soup.
Note: If you want a light rasam add less Rasam powder .I like more.


Have a tangy day,


29 August 2013

Sugar free whole wheat Zucchini Bread recipe

Sugar-free-Fat free-Zucchini-Bread-recipe


Zucchini Bread is a kind of sweet bread made up of the Zucchini. As simple as that and obviously right :) .However, it was not as simple and obvious to me when I was first introduced to this vegetable. Yes , Zucchini is nothing but a vegetable belonging to the squash family in a culinary concept but botanically speaking, Zucchini is in fact an immature fruit, the swollen ovary of the Zucchini flower as per Wikipedia .How amazing yet weird fact is that, ain't it ?

It was not until a year back I came to know about this interesting vegetable. It so happened that once when I visited my friend, she said,"I have Zucchini at my backyard" .I literally thought Zucchini is a lady who happens to be my friend's friend .Doesn't Zucchini sounds like a girl's name?? I don't know about you but for me it did .So, when we went to her home's backyard, lo and behold,"surprise, surprise" , it is a vegetable ! I was like ,"So this is zucchini" .She said,"Duhhh" .I told her I thought she was gonna introduce me to her friend named Zucchini and she started ROFL ..followed by me :D ..it was actually ROGL  (Rolling On Grass Laughing ).

So,after a hearty laugh.She asked me if I would like to have one ,take home and prepare something ,"La Zucchini special".I was like no way .Because never ever in my life until she introduced I came across this vegetable .I never saw this in India .But Wikipedia says, in India it's called  "Seemai Sorakkai" .Consequentely, I did not know what exactly to ask my mom about any zucchini recipes.So,I did not have any foolproof recipe in hand.My friend said,"You'll have a recipe when you will try mine." I said okkk.She gave a bread slice and asked me to taste it.I tasted and it felt so good because it was sweet and I love anything sweet and moreover I can hardly taste any vegetable I mean Zucchini in it .She told so that's Zucchini bread recipe for you.You love it,you take it,you make it and I DID.

Since then I made Zucchini bread couple of times and also came up with a few other interesting recipes as well. Now it's a "To buy" grocery. But when I think of the ovary stuff, It's a bit turn off.

When it comes to the health facts related to Zucchini, it is a must have vegetable in your kitchen, palate and plate. This is what I found when I spied on this strange vegetable's whereabouts and facts especially from Wikipedia. (If interested read this otherwise fast forward to the recipe :) )

First thing first, This is Zucchini (Photo courtesy :flowers.org) .I forgot to take a picture of my zucchini as I already shredded it.

  1. Zucchini originated in America but were re-introduced and popularized by the Italian immigrants . Even the name zucchini is derived from the Italian word Zucchina which means 'Small pumpkin'.
  2. Zucchini has only 25 calories and 95% is just water. Even it's flowers are edible .
  3. It's a nutrient and vitamin packed with folate, manganese, Vitamin A, Vitamin C , potassium even more than Bananas to name a few.
  4. It is fat free, cholesterol free, low in sodium and with other vital vitamins & minerals and so, according to the world's healthiest food nutrition info , Zucchini can even aid to prevent cancer and heart diseases .
So, after knowing all these valuable info how can I not include it in my cooking menu and you should too .You will not regret it .Like this bread recipe as instructed by my friend but here with my tweaks to make it more health friendly as I used whole wheat instead of all purpose flour and Stevia (natural sugar sweetener) instead of sugar .

So, here goes my ,"Sugar free whole wheat Zucchini Bread recipe"


Ingredients :

1 cup shredded Zucchini 
1/2 cup Canola oil or any cooking oil
3/4 cup Stevia /Sugar
2 Large Eggs
1 tsp pure vanilla extract 
11/2 cups whole wheat flour
2 tsp Baking powder
1/4 tsp baking soda
11/2 tsp ground cinnamon
1/2 tsp salt
1 teaspoon milk (optional)
1/2 cup coarsely chopped nuts & dry fruit mix (I used Walnuts, cashews, almonds, raisins, cherries), if desired.


Preparations:

  1. Preheat the oven to 350°F (180°C).
  2. Grease and lightly flour a loaf pan (ideal one to bake breads) .
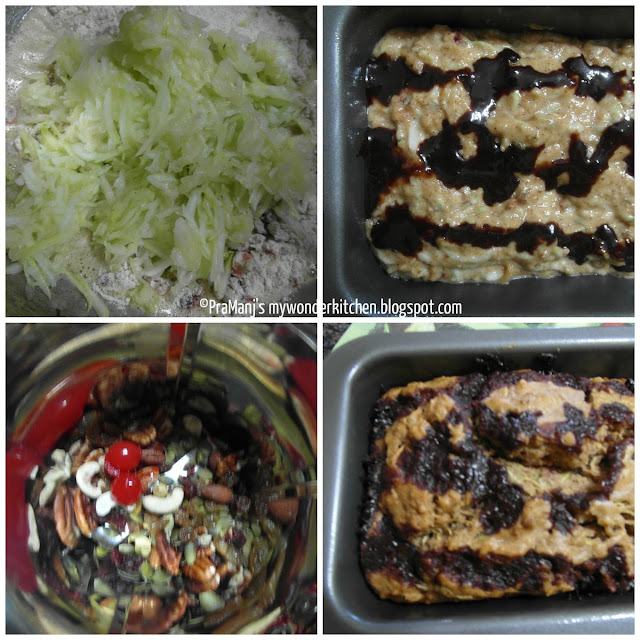
  3. Using a shredder, shred Zucchini about one cup. Set aside. (See the green shredded zucchini in the first pic)
  4. Take a deep bowl and combine oil, sugar, eggs and vanilla. Whisk them with a hand mixer or an electric mixer on medium speed for a minute max. Add the shredded zucchini in to it and stir it.
  5. Now add the flour, baking soda , baking powder, salt, cinnamon, milk and nut-dry fruit mix and stir everything until completely mixed. 
  6. zucchini_bread_recipe

  7. The batter will be stiff (i added milk for a moist bread) and now ready to be poured into the greased loaf pan.
  8. Bake it for like 50-60 minutes if it is a large loaf and 30-40 minutes if it is small or test whether it's ready by inserting a toothpick or a knife in center which should come out clean.
  9. Once done, put in the oven and let it cool a bit for like 10 minutes and then remove from the oven and allow it to cool on a cooling rack completely.
  10. Voila, Zucchini bread is ready !!
That's my breakfast nowadays . Sweet, healthy breakfast with a cup of milk.. ah.. Delish!! :).. Hope it'll last for two days at least .Wanna grab a slice ??? Here take one ;)


zucchini_bread_recipe

Notes:

1. You can use all purpose flour instead of whole wheat and sugar instead of Stevia. 
2.I also drizzled some melted dark chocolate over the bread before baking.

That's it. Have a sweet day :)


26 August 2013

Tomato Rice/Thakkali Sadam

Tomato rice


This is that (pic's) red rose recipe.No no noo not a flower recipe. In fact a tomato recipe called Thakalli sadam or Tomato rice .It is basically a South Indian recipe ,a Tamil Nadu special .South Indians are known for their immense liking towards rice .Lunch and dinner are considered incomplete without rice.So ,it led to the creation of different varieties of Rice and this sadam,which literally means cooked rice in the language Tamil made specially with Tomato is one among them .Very easy breezy tasty one pot meal it is.Honey P loves it especially the aroma during and after it's preparations.He says it's kinda magnetic and irresistible.Good for him and good for me as it is a quickie recipe :)

It reminds me of my hostel days as I got the redden ..oops,I mean golden (got carried away by the red tomatoes i guess ,excuse me :P ) opportunity to taste this delicious recipe when I was doing my masters in Coimbatore .Well,needless to say,I hated hostel days especially hostel foods .Those foods possessed the magical powers to make one lose weight like a snap.Well ,yeah at least that was the bright and the only right side of it (for me ) rest should be just left.Oh there was one more bright thing about it that it made me value my momma's handmade foods more,the way she insisted to have more those vegetables,fish,meat etc and how I would make a big fuss about it then."No vegetables,more snacks please " used to be my motto .However at hostel I craved for anything everything mom made.SIGH!!

Anyways, long story short,the only food that was yummyliciously edible and lingers in my memory  was/is "THAKKALI SADAM".I used to look forward to this dish which unfortunately they used to make once in a while.That certainly used to make my day.I used to gulp it down as if I was starving since ages .This rice is not made at our place so never got a chance to learn from my mom.Thanks to the internet and my all in all,Mr.Google guru who helped me to unearth and recreate this recipe successfully. I usually make it in couple of ways ,sometimes with or without garam masalas/Indian spice mix or any other masala powder.

This recipe is my ultimate version and my man's fave .As I said before, for him even the aroma is edible he says.So,here goes the recipe for "THAKKALI SADAM/TOMATO RICE RECIPE".

Ingredients:

Tomatoes ( Ripe) - 3 medium
Onion - 1 medium
Green chilies - 4
Ginger Garlic paste - 1 table spoon
Red chili powder - 1/4 teaspoon
Coriander powder - 1/4 teaspoon
Turmeric powder - 1/2 teaspoon
Shan's Biryani spice mix - 1-2 tablespoon 
Basmati Rice - 1 cup
Water - 2 cup
Ghee - 1-2 teaspoon
Salt- As needed

For tempering:

Canola oil /any cooking oil - 2 tablespoon
Cinnamon - 1" piece
Cardamom - 2
Clove- 4
Cumin - 1/4 teaspoon
Bay leaves - 2
Cilantro leaves (optional)
Curry leaves(optional)


Preparations :

  1. Clean the Basmati rice gently until it looks clean and clear .It makes the rice clean and starch free.
  2. Soak the rice for 20-30 minutes (For making fluffy and not mushy rice ) and then drain.
  3. Meanwhile , chop the tomatoes into cubes and slice the onions , green chilies lengthwise.
  4. Heat oil in the pressure cooker (I usually make it in my pressure cooker as it saves time ) and put everything under tempering section above in a medium flame.
  5. After a minute ,sprinkle some salt and add the sliced onions and green chilies.
  6. Saute them until onion becomes transparent.
  7. Now add the ginger garlic paste and saute till the raw smell disappears.
  8. Add the chopped tomatoes at this time ,saute till they become mushy.
  9. Add the SHAN Biryani spice mix (any) & other powders to it and saute,cover and  wait till everything looks saucy.Like this :

    9. Finally add drained rice to it,saute for 1 minute.
    10. Add 1 1/2 cups of water to it ,then ghee,salt (taste if it's enough) and mix.(like the 3rd picture in the collage)
    11.Now,cover it and pressure cook for 3 whistles .
    12.Once the pressure subsides in the cooker wait for another few minutes or be careful to open it.
    13.Fluff it with a fork/spoon or ladle slowly and there you go,yummy quickie Tomato rice is ready to be served :).So that's how my rose (a.k.a tomato) rice is made :)

    Thakalli Sadam

    The beauty of a tomato.


    Note:-

    1. The Shan Biryani spice mix has a very unique taste .It takes this simple tomato rice to a new level.If you have it or gonna buy it , add 1-2 tablespoon to make it spicy otherwise less would be better just for flavor sake. It can be substituted with Garam Masala/Indian Spice mix , use  like 1/2 teaspoon. Or omit any masalas for non spicy version.

    2.I Have an American pressure cooker which doesn't blow whistle (Good boy!!) , it takes 5-6 minutes to cook it in a medium flame but in Indian cooker as my friend told me would probably  take approx 3 whistles which I am not personally sure of as I never cooked in those cooker yet. So, do double check it for sure.

    3. Since mine is a spicy version I only have raita/yogurt sauce and pickles with it.If it's not that spicy or if you wish you can have it with any curry as well.

    4. That rose is as you may or may not know is made up of tomato's skin.


    Have a nice time.


23 August 2013

Unniyappam

Kerala Uniappam recipe


Unniyappam is one of the favorite , popular  and traditional snack of God's own country, Kerala , which happens to be my home state in India .Just like the name of the recipe it means Unni + appam ,small rice cakes in fine.They are yummy and I bet no one can eat just one .A bite of it and you will already feel you are in Kerala as it will tickle your taste buds with coconut , jaggery, coconut oil flavors in all because Unniyapams are made of rice, jaggery, roasted coconut bits and deep fried in Kerala oil, the coconut oil .

They remind me of my childhood days when my expert mommy darling used to make tons of them .My brother and I would just gobble up like a competition . Never realized how hard my mom worked to prepare those unniyappams' in the traditional way and stored it in a big can UNTIL I started making them myself here but then the instant version though and I was already feeling impatient and tired .Not to mention , now I appreciate my mom's effort more. Love you mom .Oh I am feeling nostalgic here!

By the way , my source of inspiration to make this snack are none other than riiipe Bananas .Yeah ,one day when I saw couple of Bananas riipe and felt like it's time to trash them and that day a call to my mom turned into the birth of these snacks in my wonder kitchen :D and it was instantly hit :)..though it didn't taste the way my mom made...well,how can it be it has the secret ingredient in it only she has and that's her love :)..that would make a love ly difference of course :)..unbeatable !!

So, quick yet tasty version of my "INSTANT UNNIYAPPAMS" is this :

Ingredients :


Rice flour - 2 cup
Wheat flour - 1/2 cup
Jaggery- 3/4 cup
Water -3/4 cup
Small Banana - 2 or medium Banana - 1
Dry roasted coconut bits- 1/2 cup
Baking Soda- 1/2 teaspoon
Cardamom powder - 1 teaspoon
Cumin powder - 1/4 teaspoon
Ghee - 1 Tablespoon
Coconut oil (Preferably) for deep frying


Preparations :

  1. Dry roast the rice flour in a pan for like two minutes .
  2. Melt Jaggery plus water in a pan in a low flame .Allow them to cool down and then strain it .
  3. Grind the Bananas into a puree with no lumps.
  4. Roast the coconut bits in oil in a pan or lightly fry it till it becomes light brown .
  5. Now mix well the roasted rice flour, wheat flour, melted purified jaggery, Banana puree, roasted brown coconut bits, cardamom powder, cumin powder and baking powder.
  6. The batter should have the idle batter consistency. If too thick , add little water to loosen it and if it is on the thinner side , add some more rice flour.
  7. Allow them to rest for  like an hour .
  8. After an hour , heat the coconut oil (for the authentic Kerala flavor ) otherwise any other oil or Ghee for a richer version of them in an Unniyappam chatti (a pan exclusively used to make unnyiappams) and make sure that oil should be up to 3/4th of every mold in the Unniyappam pan and not completely .
Unniyappam pan
Unniyappam chatti

   9. Once the oil is really hot, lower the flame and pour a ladle of batter into each mold.     
  10. Once they get cooked and browned , flip it to the other side and do the same.
  11. Once both sides are brown , place them into tissue papers to drain off excess oil.


  12.  And there you go tasty munchy Unniyappams are ready to be devoured.I got about 25 of'em.

   By the way, here - my Unniyappam from me to you,my dear viewer friend :)...enjoy :D


Note : The traditional Unniyappams are made in the similar way except that the raw rice is used and soaked overnight or like 4-5 hour and grounded to a "Coarse" paste not the smooth one and you can omit the wheat flour and rest all are same. That's my Mom's version but lazy me would always go for the ready made rice flour one. Will try that one fine day hopefully. Till then instant version Jai hooooo...

Sending this unni munchies to :

  1. Dish Name Starts with U


2. Walking through the memory lane by Avika & Walk Through Memory Lane - August Announcement by Gayathri

21 August 2013

Cookie with a red mole (Eggless)

Cookies,cakes,sweets just make my day .I am chasing them always not in shops but in my imaginations and then in my wonder kitchen by baking it by myself. It is so fun and more tasteful as always when all hard work behind pays off at the end.Though it's quite easy to make and bake.

Since I don't have kids yet, whenever I bake cookies I distribute them among my friends kids . They are my cuuuute guinea p*** then :D and they don't mind it at all,in fact lovvve it .I love watching them devouring and crunching happily .Moreover, I am just practicing and preparing myself to learn different types of cookies as many as I can ,so that when I'll have my own kids ,I can pamper their sweet tooth once in a while fresh from my wonder kitchen .O God I can't wait !

Usually a basic cookie recipe and creativity are all needed to make varieties of cookies I believe .So,here is one such ,which is light,Egg less and jammy .Perfect for tea time .For me anytime :) and I call them  easy breezy "Cookie with a red mole " . Kids go gaga over them :) By the way did you know that if you eat these cookies non-stop you may end up with red moles on your face .Well,how weird is that ! 8-) hehe just kidding...yeah you got it ,that's how I emotionally blackmail those kiddos from munching non stop obviously :) and it works like a charm hehe.And that is how the cookie got the name :).

Cookie with jellly


Ingredients :-

All purpose flour/Maida - 1 cup
Salt - A pinch
Baking powder - 1/4 teaspoon
Unsalted butter - 1 cup/8oz
Sugar -  1 cup
Vanilla or any other preferred essence - 3 drops
Strawberry Jam - As needed.

Preparations :

  1. Pre heat the oven to 375 F°/190 C°.
  2. In a bowl mix flour,salt ,baking powder,sugar and sieve it to another one.
  3. Once the butter comes to the room temperature kinda soft not liquid/melted ,mix it with the above mixture.
  4. Knead them with hand to a smooth dough .
  5. Cover them and allow them to rest for 5-10 minutes.
  6. After 10 minutes divide the dough into like 25 round balls.
  7. Now press them down a bit and put a thumb indentation in center of each ball.
  8. Put the strawberry jam or any jam you prefer into the indentation made in the ball.
  9. Bake them for like 10-12 minutes or until done.
  10. Make sure it doesn't get too brown.It should remain white to off-white.
  11. Once done allow them to cool for like 5 minutes.
  12. Then serve and  relish .


17 August 2013

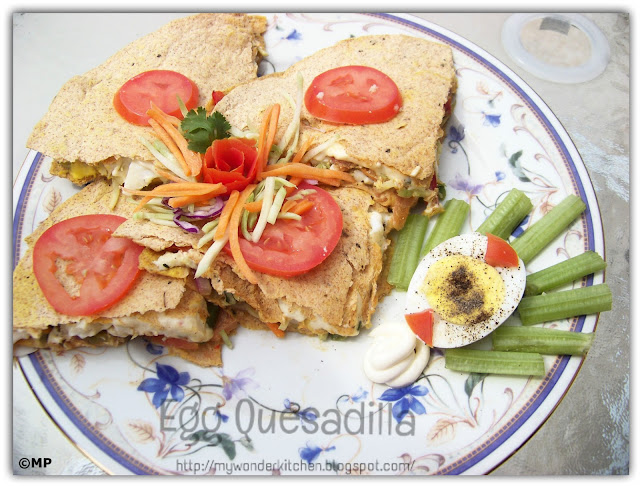
Egg Quesadilla

Mexican Egg Quesadilla recipe


I love Mexican foods. I find them spicy ,tasty and healthy enough.

Just as Wikipedia says ,” Mexican cuisine is primarily a fusion of indigenous Mesoamerican cooking with European, especially Spanish, elements added after the Spanish conquest of the Aztec Empire in the 16th century. The basic staples remain native foods such as corn, beans and chili peppers, but the Europeans introduced a large number of other foods, the most important of which were meat from domesticated animals (beef, pork, chicken, goat and sheep), dairy products (especially cheese) and various herbs and spices.”

Quesadilla is one such popular Mexican cuisine .It is usually made of flour or corn tortillas (a thin round shaped flatbread made up of finely grounded Maize/Corn with a striking resemblance to our Indian Chapati/Roti though the taste and texture differs ).

These Tortillas generally have meats and or vegetables and cheese fillings in them and then finally they are folded in half forming a half-moon shape and then usually cut into slices or wedges .

Not to mention,it is one of our favorite Mexican food we would love to eat always.

Since I believe ,”Variety is the spice of life” and I love Eggs ,I made my version of a typical Quesadilla with EGG and vegetable combo and Thank God it came out well .Honey P loved it.

So,here is how I made my EGG QUESADILLA

Ingredients

4 Flour tortillas ( I used OLE’S tomato basil flavored )
1 tablespoon butter / canola oil
1 1/2 cup shredded Pepper Jack cheese 
2  Eggs boiled & sliced thinly roundwise
1 cup of shredded onion, red cabbage,carrots.
Salsa (as desired)
1 tsp Southwest Sandwich sauce (optional)
Ketchup(optional)
Salt & pepper(Sprinkle as desired)
Sour cream
Lettuce
Guacamole

Preparations 
  • Coat one side of Tortilla with butter or any oil and place the buttered /oiled side down on a lightly greased baking sheet.
  • Top it with round egg slices , sprinkle salt & pepper ,add salsa ,then shredded vegetables -red cabbage,carrots,broccoli stalk& onion .
  • Top it with little Southwest sandwich sauce plus little Ketchup and Pepper Jack cheese .
  • Cover it with another Tortilla and brush the top with butter or oil .
  • Bake at 375° for 10 minutes or until crisp and golden brown.
  • Cut into wedges; serve with Sour cream, Lettuce and guacamole. 
  • Egg Quesadilla is ready.ENJOY!!!
Note :
  1.  Instead of baking Quesadilla ,it can also be prepared in a pan.For that take a pan wide enough to prepare Quesadilla,pour 1/4th cup of preferred vegetable oil and put one tortilla then mixture of egg ,vegetables plus cheese and other sauces if using and when it gets brown at the bottom top it with another tortilla and flip and when it gets brown as well take it out and cut it into wedges /slices.I preferred baking because it is healthy compared to pan .
  2. Salsa is a Mexican sauce made up of tomato,onion,cilantro,lime juice basically.Though there are many ways to prepare them and therefore many types.I used ready made one here.
  3. Guacamole is also a Mexican sauce made with Avocado as the main ingredient and there are many ways to make them.Quick to make and are very healthy as well.I had ready made one so I used that.Someday I'll be posting the Guacamole recipe as well.

I am submitting this recipe to the events :

  1.  Flavours of Mexico and simply.food .

  1. Lets Cook with Cheese 


14 August 2013

Rainbow cake

Rainbow cake recipe


I love anything sweet .That's why I am a sweetheart."Eat sweet,Be sweet" is my funda/motto after all ,hehe just kidding.Well,when it comes to cake,for me even a slice of it is like a slice from heaven .However it was not so when I baked for the first time .Excited I geared up to make n bake and the end result ..welll ,ummm ..aaa may be ..um...yes..no not that...okkk I've no idea what it became .All I was sure of was it was indeed edible hehe .So, I ended up baking and eating all by myself .Oh boy ! It was indeed not a piece of cake....PHEWSSSS!!!

Nevertheless I  never gave up..I kept on trying ,torturing honey P on every memorable occasions of our life ..He was like eventually tired of being a guinea p** (whoops ;p) especially when it came to cakes (one of the reason being he is not a big fan of sweet stuff except me ;) )... ....So he sorta declared himself "Cake free" ."Say no to cakes" became his motto UNTIL one fine day I made a colorful surprise for him .Not to mention he was speechless in a good way .However he could not resist himself to be tasteless this time .He tasted a bit,then a bite and then a big slice and then before he would finish the colorful delicacy saga,I had to say "Sorry for the interruption honey P" ,gimme sometime to click .Please please.Will you ? He said only on one condition ,'I will decorate it for the click." and I had to oblige because even I wanted to enjoy every bit and bites of it ASAP and this seemed to be the only way that could have stopped him ..kinda ironic ..once i was trying to tempt him to savor my cakey creations and now I was finding excuse to stop him HOWEVER just for a click then after a big slice it was all his .

Basically , It's a simple recipe .The colors used makes all the difference and colors make me super happy and when it is in the form of a sweet well...what to say...like "Simply irresistible" !!!

So,let's check out the recipe for my "Rainbow cake" that stole Honey P's heart and stomach ,of course with his decoration :

Ingredients:

    3 cups sifted self-rising flour
    2 cups sugar
    1 cup butter, at room temperature
    4 eggs
    1 cup milk
    1 tsp flaxseed (optional)
    1 teaspoon pure vanilla extract or any flavor of your choice
     Betty crocker’s Gel food colors
     Icing (optional)


Preparations:

·         Preheat oven to 350 degrees F.
·         Using an electric mixer/hand mixer, cream butter until fluffy.
·         Add sugar and continue to cream well for up to approx 5 to 8 minutes.
·         Now ,add eggs one by one and beat well after every egg addition.
·         Add sifted self rising flour,flaxseed(optional) and milk alternately to the above mixture, beginning and ending with flour.
·         Add vanilla and continue to beat until just mixed.
·         Take 4 different bowls and pour the prepared batter equally to each one of the them.
·         Now pour a drop or two or more of preferred gel colors as required to get the desired color in all those four bowls of batter respectively.(I used red,green,blue & yellow) and mix it .   
·         So,now I've four bowls of cake batter in four different colors.
·         Now,Grease and flour the cake pan.
·         Pour four batters in to the cake pan layering one by one.  
·         Now bake it for 25 to 30 minutes or until done.
·         Once done,cool it for 5 to 10 minutes.
·         Enjoy the rainbow in your cake :)


By the way how's my man's decoration ?:)